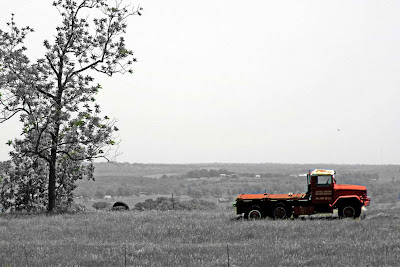
 The only thing that was really interesting in this shot was the old red truck. It was sitting out in the middle of a field in northern Arkansas. The day was humid so the sky wasn't very blue and the fields were still a bit brown from winter, not the lush green they are now. So I chose tonight to be a Photoshop Lab night and play in monochrome. This was so easy; I can't wait to attack a bunch of other filed shots that can be saved in this manner.
There is still lots of time to share your monochromatic photos. Check out Carmi's blog at Written, Inc for the rules and to get links to others' terrific photos.
Addendum (7/26/08; 6:00 pm):
The response to this photo has been very gratifying and I've been asked how I did it. So, in the spirit of blogship, here are the steps as I wrote them for Smarmoofus who has a couple of great shots at her site.
When I decided I wanted to do something to save the photo of the truck I knew it was to just isolate the rusty red color. I knew this could be done because I had seen it in wedding portraits, etc. Since I already new I could transplant heads from one group shot to another (that's a whole different story) bleeding out color should be a piece of cake! (So were the head transplants, actually)
I use Photoshop Elements 6 and bought the detailed manual, which contains the secrets to Elements.
1. The first step is to open the file in full edit, then create an other layer with Ctrl J.
2. Then select the brush tool by pressing B.
3. In the pop-up menu for the brushes select a medium soft (I like the 65).
4. Still on the options bar, change the brush Mode to color (it's toward the very bottom of the pop-up menu).
5. Next, press D to select the color black. This will serve to change the area you want to b & w.
6. Now you are ready to color, or rather de-color. Just move the brush over the entire area you want to take out the color, leaving color on the focal point(s).
7. If you accidentally color out of the lines you can go back with the erase tool and restore the color.
Tada! You're done! Now do a save as so you don't lose the original, of course. Photoshop will want to save as a .psd file but I change to .jpg so it can be easily emailed or put on the web.
11 comments:
WOW! Easy? I've been wanting to tackle something like this, but I don't know how to retain just that spot of colour while desaturating everything else. Teach me! This shot is perfect! I totally know what you mean about the humid haze robbing the sky of its colour. That's why I like the fall so much... the air dries out and you get those crystal blue skies that overwhelm you with how vivid they are. But in the summer... bleh.
(You were in Arkansas?)
You can email me if you wanna share your secrets... *hint hint*
-smarmoofus
I love this, too! Keeping the red makes the photo so much more interesting. I'm gonna have to figure out how you did that...
Those Table Rock Dam shots are amazing! My family's heading to Branson for a few days tomorrow. I'll have to go to the dam and see if it's running (which I assume it still is after all the flooding).
I love the red truck.....what photo editing program do you use?
Thank you, Barb! I thought you might want to see this. Jenelle, she'll share! She's ever so kind!
-smarmoofus
woooo! i'm glad i decided to come back here since smarm mentioned you told her how to get this effect. i love it. i've always wanted to do it. unfortunately, i don't have a photoshop program...i have some diff photoshop thing (read:cheaper) LOL but i'm gonna bookmark this post for sure. :)
p.s. i have just ONE photo, for these weeks theme, up.
oh wait...transferring heads? now i gotta know how to do that, too!
I love that!!!!
little pop of color
SO COOL!
Love this shot. Very Schindler's List. I might have liked it even without the enhancement, but this definitely makes it "pop".
Love the shot! I do the same thing, only in reverse. I create a second layer and desaturate it. The color layer is underneath. Then I erase the area where I want the color to show through.
It's kind of fun to find out the various ways we can achieve the same end. :D
This is a neat photo with the effects!
thanks for the instructions..i don't have photoshop but just may have to get it...but it's interesting you did this to your pic as a friend of mine did a similar thing to her photo of her kids and she actually used a website called www.picnik.com
just another tip to put out there! love the pic of the red truck...it evokes great memories i had living out in the prairies!!
Post a Comment